Although it is still beta, there do not seem to be any major changes going on in the game so I figured I would once again put what I've learned for everybody's benefit in terms of crafting.
Crafting in TESO is very similar to other games, so it does not take a lot of rocket science; however, the way the UI is presented it is initially daunting on what and how to craft. Provisioning (cooking) is relatively simple...you get foodstuffs, you go to a cooking fire, and the recipes you have learned show up as the final products if you have all the materials....just click create and voila.
The other crafting skills on the other hand, are a bit more intricate and it is these I will be focusing on within this guide...with the key differences pointed out at various points.
The crafting abilities within TESO are the following:
- Alchemy - to make potions giving immediate and over time buffs
- Blacksmithing - to make plate (heavy armor) as well as weapons (axe (1H and 2H(, dagger, sword (1H and 2H), maces (1H and 2H), etc.)
- Clothing - to make both cloth (light armor) and leather (medium armor) items
- Enchanting - creating Glyphs which can be applied to jewelry, armor, weapons
- Provisioning (aka Cooking) - to make long-term buffs. Cooking is further broken down into making food (increase max stats) or drinks (increase regeneration of stats)
- Woodworking - to make staves, wands, bows, and shields
To begin with, just like every other MMO we have played, there are four basic phases of crafting an item:
- Gathering raw materials
- Refining raw materials into crafting materials
- Creating
- Enhancing the crafted piece
The last phase, enhancing the crafted piece, is an optional phase; however, it does come into play to make that "perfect" item that is even better than the base items.
I would also like to add a fifth phase to crafting which you will get into at later (>15) levels, and that is, LEVELING YOUR CRAFTING SKILL...more on this below.
I want to break down each one of these phases individually, although some are fairly intuitive...but wanted to make sure this guide is pretty well-rounded for even a newbie coming into the game or MMO's in general.
Gathering Raw Materials
Gathering raw materials in TESO is pretty self-evident and something you do on your first opening of a stray barrel, crate, or trunk you find in the world. You do not need to "train" any gathering procedures, nor do you need any tools to gather--you find the raw material in the world at large, and take it.
As you explore the world of Tamriel you will come across plants (for alchemy and clothing), ore mines (for blacksmithing), essences (for enchanting), rawhides from killed animals (for clothing), water (for alchemy), wood (for woodworking) and foodstuffs (for provisioning/cooking). Each of these are used for the various crafting skills and whether you choose to craft or not, I highly encourage everybody to NOT vendor these items, and instead, if you are not going to craft, to put them in the guild bank so that others can make use of them.
Gold in the game comes into its own after level 10. I was able to expand my backback 2 times (200, then 2000 gold), expand my bank (1000 gold), as well as buy a few random item boxes from vendors and still end the beta with 2000+ gold. Once you can start hitting the first tier of dungeons (level 12+) you start to make money, so vendoring crafting items does not really gain you much, but the end benefit of not only helping your guildies, but allowing them to make YOU items you would otherwise not find to increase your character's advancement is well worth it!
Refining Raw Materials
For clothing, woodworking, and blacksmithing you must further refine those materials into the crafting components. Iron ore needs to be smelted into iron bars; rawhide leather needs to be tanned into refined rawhide; and jute needs to be weaved into refined jute.
One of the issues I have with crafting is when you open a crafting station (anvil for blacksmithing, tanning board for clothing, etc.) you are immediately given the UI for Crafting, the third piece of the puzzle. So the first question people have is "How do I refine my raw materials?"
Below is the crafting window for Clothing. I have labeled the menu bars:

From left to right:
- CREATION tab
- IMPROVEMENT tab
- EXTRACTION tab
- RESEARCH tab
I will be going over each tab in detail in this guide; however, for now, we want the EXTRACTION tab (I know, it's not intuitively obvious). Extraction servers two purposes, break down existing items into its crafting components, but also to refine RAW items into their refined crafting components. For example, you take rawhide scraps and convert them into rawhide, you take raw jute (a plant) and spin it into jute (a fabric), iron ore into bars, raw wood into planks, and so forth.
The only skills which do NOT require you to refine materials are Provisioning, Alchemy, and Enchanting, which I will point out later.
Below is the window for Extracting (in this case refining) raw materials:

As you can see, I've chose the SECOND sub tab, "Raw Materials" which allows me to refine the items for this particular craft (Clothing). The items are "reddened" out because, as you can see from the middle low window, I require 10 items to refine. The ratio is NOT 1:1, ie., when I use 10 rawhide scraps, I can make more than one refined rawhide. The amount of material you can make depends on your overall crafting level for that skill. Initially I would only make a few items; however, as time went on, I was making more and more leather from rawhide scraps.
When you DO have enough items, it is as simple as hitting "R" and refining the items. As of this beta there was no long pause like they did to Provisioning in order to refine items...so it was only a few seconds to refine 100-ish rawhide scraps or jute into mats.
Creating Items
Before we create our item, there is one thing I should go over here and that is in regards to "Styles." The Style of crafting is based upon your race, so for a woodelf, you start off being able to create "Bosmer" styled items. In this beta, the following styles exist:
- Woodelf - Bosmer Style (uses Bone)
- Nord - Nord Style (uses Corundum)
- High Elf--Altmer Style (uses Adamantite)
- Kajiit - Kajiit Style (uses Moonstone)
- Argonian - Argonian Style (uses Flint)
- Breton - Breton Style (uses Molybdenum)
- Dark Elf - Dunmer Style (uses Obsidian)
- Redguard - Redguard Style (Starmetal)
- Imperial - Imperial Style (uses Nickel)
- Orc - Orc (Orsimer) Style (uses Manganese)
There are also some styles not based upon actual races:
- Ancient Elf (uses Malachite)
- Barbaric Style (uses Copper)
- Daedric Style (uses Daedra Hearts)
What this means in terms of crafting is twofold. First, you need to have that race's "item" to craft. So for example to make Bosmer styled items, you need bone, for Kajiit you need Moonstone, for Dunmer, you need Obsidian. These "style" items are the second component used in crafting.
You are not locked into your own race's style. As you explore the world and loot, you will come up with "Racial Faction" books, which when you read them, open up that race's crafting style.
The styles are all the same stats; however, they are a different look, allowing you to create items that visually look different from other items. In this beta I made a Nord robe for Shartenn, and later a Bosmer robe for DH--unfortunately I did not take a screenshot of them so cannot show you the differences, but hopefully next beta I can take one and insert it here so you can see the differences.
Not only does learning a new crafting style allow you to make visually different items, but it also expands upon the materials to make items. At the time of the last beta, I was able to make Nord, Imperial, and Bosmer items. This meant I was not just limited to having to find bone, but could also use the different items for the other races. Basically it expands the limitations of what is needed to craft allowing you to make use of even more materials.
The "style" items are found both in the world at large (the cheaper method) or purchased from the crafting vendor near each station for 21g. It is a 1:1 relationship, so to make one item, you need 1 style item, to make 2, you need 2, and so forth.
Below is the crafting window for clothing. You can see it is divided into four sections:
- The item you wish to craft (i.e., the end result)
- The amount of refined materials needed to make the item
- The "style" item required
- Additional stats to add to the item (optional)

The item you wish to craft is the base item (e.g., robe, shoes, gloves, belt, helm, shoulderpads, pants). This does NOT have anything to do with the stats of the item, only the basic item you are creating.
The Material pane (2) is how much refined materials you need. As you can see in the image above boxed in yellow, there are +/1 beneath the item. This allows you to create items for different levels. If you click the + button, the end result (5) would show level 2 items, increasing the number of jute needed.
Armor goes up every two levels. You can start with level 1 items, but after that, each click of the + lets you create armor for level 2, 4, 6, 8, etc.
The Style pane (3) I have already mentioned. In this case, I am carrying Conundrum allowing me to create in the Nord style, as well as several Bone to make the Bosmer style.
For now I am skipping the Trait pane (4), as it is part of the "enhancement" process I will discuss below.
Finally there is the final product window (5) which shows you the base stats and level of the item you are creating. Again, as you click the + and add more materials, you will create items at higher levels.
One thing to note is you can only create items as high as the tier of crafting you are spec'd in. As I was only Tier 1 of crafting, I could only make items levels 1-14. Level 15+ is Tier 2 crafting. This is again explained further below in "Leveling your crafting".
To make the item, you simply press "R" to "Craft" and voila, you have a new and shiny item!
Enhancing and creating green/blue/epic/legendary items
There are THREE different ways you can create or add stats to your armor/weapons in order to make them better:
- Adding "traits" (which is performed at the time of crafting the item)
- Adding "Glyphs" (which are obtained from the world at large or through Enchanting)
- Improving the existing item (think of it as WoW-type of enchanting)
Adding "Traits" to items
Adding traits to items is done AT THE TIME OF CRAFTING the item; however, in order to add a trait, you must first "research" and learn what component is required for that trait.
Traits are additional boosts to items such as increasing attack speed, increasing mana regeneration, increasing durability, increasing value, etc. They are basically "passive" skills which are added to items to make them more worthwhile.
Again, before you can add a trait to an item, you must first learn--or Research--that trait. Below is the "Research" window for clothing:

The labels are as follows:
- Research tab
- The number of items you are researching and can research (e.g., 0/1, 1/1)
- The item you are researching as well as the time left to "learn" the trait
- The types of traits you can add to that item
From the window below, you can see I am current researching the train "Sturdy" for cloth hoods and I currently have 3 hours left (real world time) to learn it.
To start out, you first need a piece of armor that has a trait on it. You then research that items (losing it in the process) to learn the trait. In this case, I had a magical cloth hood with the "sturdy" trait--increasing base armor--that I could learn. When you have an item in your inventory with a trait upon it, you'll see a number beneath that item in the window (3) on how many of that item you have with traits.
Researching is the first trait of a particular items is SIX HOURS of real world time (not in-game time). Per Bosmerle on Tamriel Foundry, each additional trait for the same item DOUBLES the time, so the second item is TWELVE HOURS, the third twenty-four, and so forth. I have yet to confirm this as I was only able to research one trait per item, so be forwarned about choosing which traits to research!
When a trait is "unlocked" you will be able to see what gem is required in the CRAFTING of that item to add the trait. Unfortunately I did not take a screenshot to show you an unlocked skill...but these are the gems you find in the world at large--bloodstone, diamond, emerald, ruby, etc.
So for example, to make a cloth hood that has more armor than the "base" cloth hood, I would need the refined cloth (Jute), the style item needed (e.g., bone for Bosmer), as well as an emerald. Note, these are NOT the same items that are used for styles, but other "gems" you find in the world. Typically when you look at the properties of the item it will tell you what traits that stone has.
Again, the main things to remember are 1) the item is destroyed upon researching it; 2) researching takes 6 hours for EACH trait for EACH item, 3) gems are required to add the trait once you know it.
Here are the various traits and their items and what they do:
- Armor - "Sturdy" (Quartz) - Avoid decay when defeated (decreased durability)
- Armor - "Impenetrable" (Diamond) - Increase resistance to Critical hits
- Armor - "Reinforced" (Sardonyx) - Increase Armor value
- Armor - "Well-fitted"(Almandine) - Reduce stamina cost of sprinting
- Armor - "Training" (Emerald) -Increase Armor skill-line experience for this armor type
- Armor - "Infused" (Bloodstone) - Increase Armor enchantment effect
- Armor - "Exploration" (Garnet) - Increase exploration experience
- Armor - "Divines" (Sapphire) - Increase Mundus Stone effects (shrine buffs)
- Weapon - "Powered" (Chrysolite) - Reduces the cooldown of Weapon enchantments
- Weapon - "Charged" (Amethyst) - Increases enchantment charges
- Weapon - "Precise" (Ruby) - Increases Weapon and Spell critical values
- Weapon - "Infused" (Jade) - Increase Weapon enchantment effect
- Weapon - "Defending" (Turquoise) - Increases total Armor and Spell resistance
- Weapon - "Training" (Carnelian) - Increase Weapon skill-line experience for this weapon
- Weapon - "Sharpened" (Fire Opal) - Increase Armor and Spell Penetration
- Weapon - "Weighted" (Citrine) - Increase Weapon attack speed
Adding "Glyphs" to items
Adding Glyphs to items is relatively easy. If you find or create a glyph (for armor, weapons, or jewelry), you right click the item you want to add it to and select "Enchant." You will be presented with a window that shows what glyphs you have in your inventory to add to that item, as well as what the final product will be upon adding the glyph.
Glyphs can be "overridden" by applying a new glyph, which will replace the existing glyph and add the new one...so you can change things as they go on.
Glyphs typically add magical properties to items. For example, I added a Fire Damage glyph to one of my daggers which allowed 4 fire damage to be applied to my target. These properties are usually "procs" in that they do not automatically happen, but have an increased chance to occur. When they happen, they burn up a certain amount of "charges" which when empty, no longer occur until you reload your weapon's charges with a charged soul gem.
Improving the rarity of existing items
Not only can you make an item better crafting it or adding magical properties through glyphs, you can also increase the overall stats of your item by "Improving" it. Improving an item increases its rarity. White (common) items can be made into Green (magical) items. Green items can be improved into Blue (rare) items. Blue items can be improved into Purple (epic) items, and lastly, epics can be converted into Legendary items (gold).
The concept is similar to Asian MMO's where you can improve an item to +1, then +2, etc.
As with Asian MMO's, improving an item has its risks--you have a likelihood of DESTROYING the item you are improving!
Thankfully, the percentage or risk of improving an item can be alleviated as I will mention below.
Below is the Improvement window for Clothing:

The improvement window is pretty simplistic, divided into the window of items you have in your inventory to approve (1), and the "timeline" type window showing the progression of your improvements.
To improve an item you need the appropriate items used to improve. These items are gathered through EXTRACTING green or better items, as well as rarely finding them in the world. Each item adds a 20% chance to improve that item...so if you only have one item as I show above, that means I only have a 20% chance to improve it into a Green (magical) items...therefore an 80% chance of FAILING and DESTROYING the item I wish to improve.
So you need FIVE of each rare improvement item, in the above case Henning, the Tannin required to improve Clothing items, to guarantee a successful improvement.
The catch is improvement items are RARE and HARD TO FIND. The only ways I found in the beta was through destroying magical or better (green, blue, epic) items for a CHANCE to get an improvement component, or through my hireling's deliveries (more on that below with leveling crafting).
Whether you want to take a chance and NOT have 5 items (which sometimes you have to do) or do have five items, you click "R" and pray to the gods.
Leveling Crafting
There are two processes involved in leveling your crafting. The first is as you make items (crafting, improving, researching, or even extracting), your crafting skill level increases. In the above images you can see that at the time I took the screenshots, my Clothing skill was level 6.
The level of crafting allows you to extract more items, whether from raw materials or created items you break down, as well as increases the chance of breaking down and getting improvement items.
Even though your skill passively increases as you make items, eventually you will "cap" out. Tier 1 of crafting allows you to make items between levels 1-15. In order to make better materials, you much invest skill points into your crafting!
This is where the true crafters will prevail over people just passively interested in crafting. In order to increase your crafting skills, you need to invest precious skill points into your craft. As skill points are obtained through levelings, finding skyshards, or rare quests, only those truly interested in crafting will use skill points towards crafting instead of attack, armor, etc. skills.
Below is the Clothing skill tree:

As you can see from the image, I have already invested two skill points into my Clothing tree. All skills have the same basic skills, so here is a brief rundown of them:
- Tailoring - this is the "tier" of items you can make. Initially you start off with the ability to make level 1-15 items. Adding a skill point into this top level allows me to make Tier 2--level 16-25--items. The next tier of items require different materials, so whereas Tier 1 cloth items require Jute, Tier 2 items require flax. Although we did not get to go into the next realms, I am sure the higher level areas have flax instead of Jute growing.
- Keen Eye - causes items you gather to "glow" in the world when you are near them. All the crafts requiring you to gather items have this skill. When you get close to an item in the world (e.g., in this case, Jute for clothing) it causes the Jute Plant to glow, making it easier to see. The different levels increase the range of observing the items. I could foresee people creating "Gathering" alts and only putting skill points into this skill to allow their main crafters to devote precious skill points into just crafting.
- Hirelings - allows you to "hire" an imaginary NPC who will randomly mail you items. In this first tier, the hireling mails something once every twenty-four hours (real world time). I only had this skill for one day and my hireling sent me a BLUE improvement item (Embroidery) and several Flax refined materials. Additional levels increase the amount of items your hireling sends you.
- Unraveling - this skill improves your Extraction skill, allowing you to get more items from extracting (both items you are breaking down as well as items you are refining). The caveat here is you need to also increase your top skill (e.g., Tailoring) so you can USE those items. I cannot have a character who can refine Flax unless I invest a skill point into Tailoring, so this limits the ability of having a gathering alt perform this function. In the long run, it will require additional skill points from the CRAFTER to level this skill up.
- Stitching - reduces the amount of time it takes to research traits and allows for researching more than one trait at a time.
- Tannin Expertise - This increases the IMPROVEMENT abilities, increasing the percentage chance of improving your items. As I mentioned above, you start off with 20% chance to increase, meaning you need 5 items for a 100% chance of success. Adding a point into this increases the percentage to 25%, requiring one less item for a 100% chance of success and so on.
For a complete listing of each craft's skills, please refer to this thread below...
Alchemy and Enchanting
Alchemy and Enchanting are a bit different from the other crafts so I would like to point out some of the differences.
Alchemy
Alchemy involves the creation of potions allowing both immediate (i.e., instant health replenishment) or transient (increases regeneration, weapon crit, etc. for a short period of time--i.e., seconds) during fights through your Quickslots.
Alchemy has two phases--learning what a plant does, and creating the potions.
When you first find a plant, you will see that plant has four characteristics which are "Unknown." For those that played Skyrim you will recognize this process immediately. You first have to "learn" what the plant does by mixing it with other plants and making a potion, which will reveal what properties that plant has when combined with the other plant you used.
Basically you require TWO plants which has the SAME PROPERTIES to make a potion. So to make a health potion, you need to combine two plants which have "Restore Health" properties. When two plants have the same properties, you can make that potion...so if two plants share more than one property, the potion you create will cause ALL the shared properties to be on that potions. As such, you can make potions that restore not only your health, but also stamina, or add health regeneration and weapon crit, and so forth.
Below is an example of the Alchemy crafting window:

In the above picture I am carrying, or have in my bank, three plants--Lady Smock, Water Hyacinth, and Wormwood.
In addition, I have discovered a few properties of those plants:
- Lady's Smock - Restore Magicka (instant mana)
- Water Hyacinth - Restore Health (instant health) and Weapon Crit (increases weapon crit for x seconds)
- Wormroot - Weapon Crit
In the above image I have Lady's Smock and Wormroot selected to create an "Unknown Potion." When I "R" to craft if those two plants share a trait, I will "learn" it for each plant.
Notice the other ingredient required to make potions is Water. There are different types of water, just as there are different crafting items, throughout the world. Natural Water makes potions level 1-9. Clear Water creates potions from level 10-19, and so on.
If the two plants you combine do NOT share characteristics, you will destroy the plant and get nothing out of it.
Below is the window when combining two plants with shared characteristics:

In this case I am combining Water Hyacinth and Wormroot, both which contain the Weapon Crit property. In the creation window in the center of the screen you can see the potion and properties it will contain...in this case, increasing weapon crit by 601 points for 10 seconds during a fight.
As you wander the world and find plants, if you do not plan on training alchemy I once again urge you to put them in the guild bank for others to benefit. Obviously when doing raids and dungeons potions can be the turning point in winning or wiping against a boss or player!
Enchanting
Enchanting is also a little unique, but very similar to Alchemy.
In enchanting, you combine one of each type of Runes--Potency (square), Aspect (triangular), and Essence (round).
As with Alchemy, when you first find a Rune, their properties are Unknown...you need to combine them with other runes to discover those properties. Once you discover the properties of each rune you can then create Glyphs to add to armor, weapons, and jewelry.
Below is the basic Enchanting window:

In the first Potency slot I have a Jode Rune, which adds "Reduce" to my glyph. What I THINK (not completely certain) this means is when I create a glyph of Fire Weapon for example, Jode reduces the charges required for that specific skill to proc.
Basically you learn the combinations of runes to make the appropriate Glyph, tweaking those properties with runes of different types to create glyphs of different enhancements.
Runes are found in the world at large or by "Extracting" glyphs:
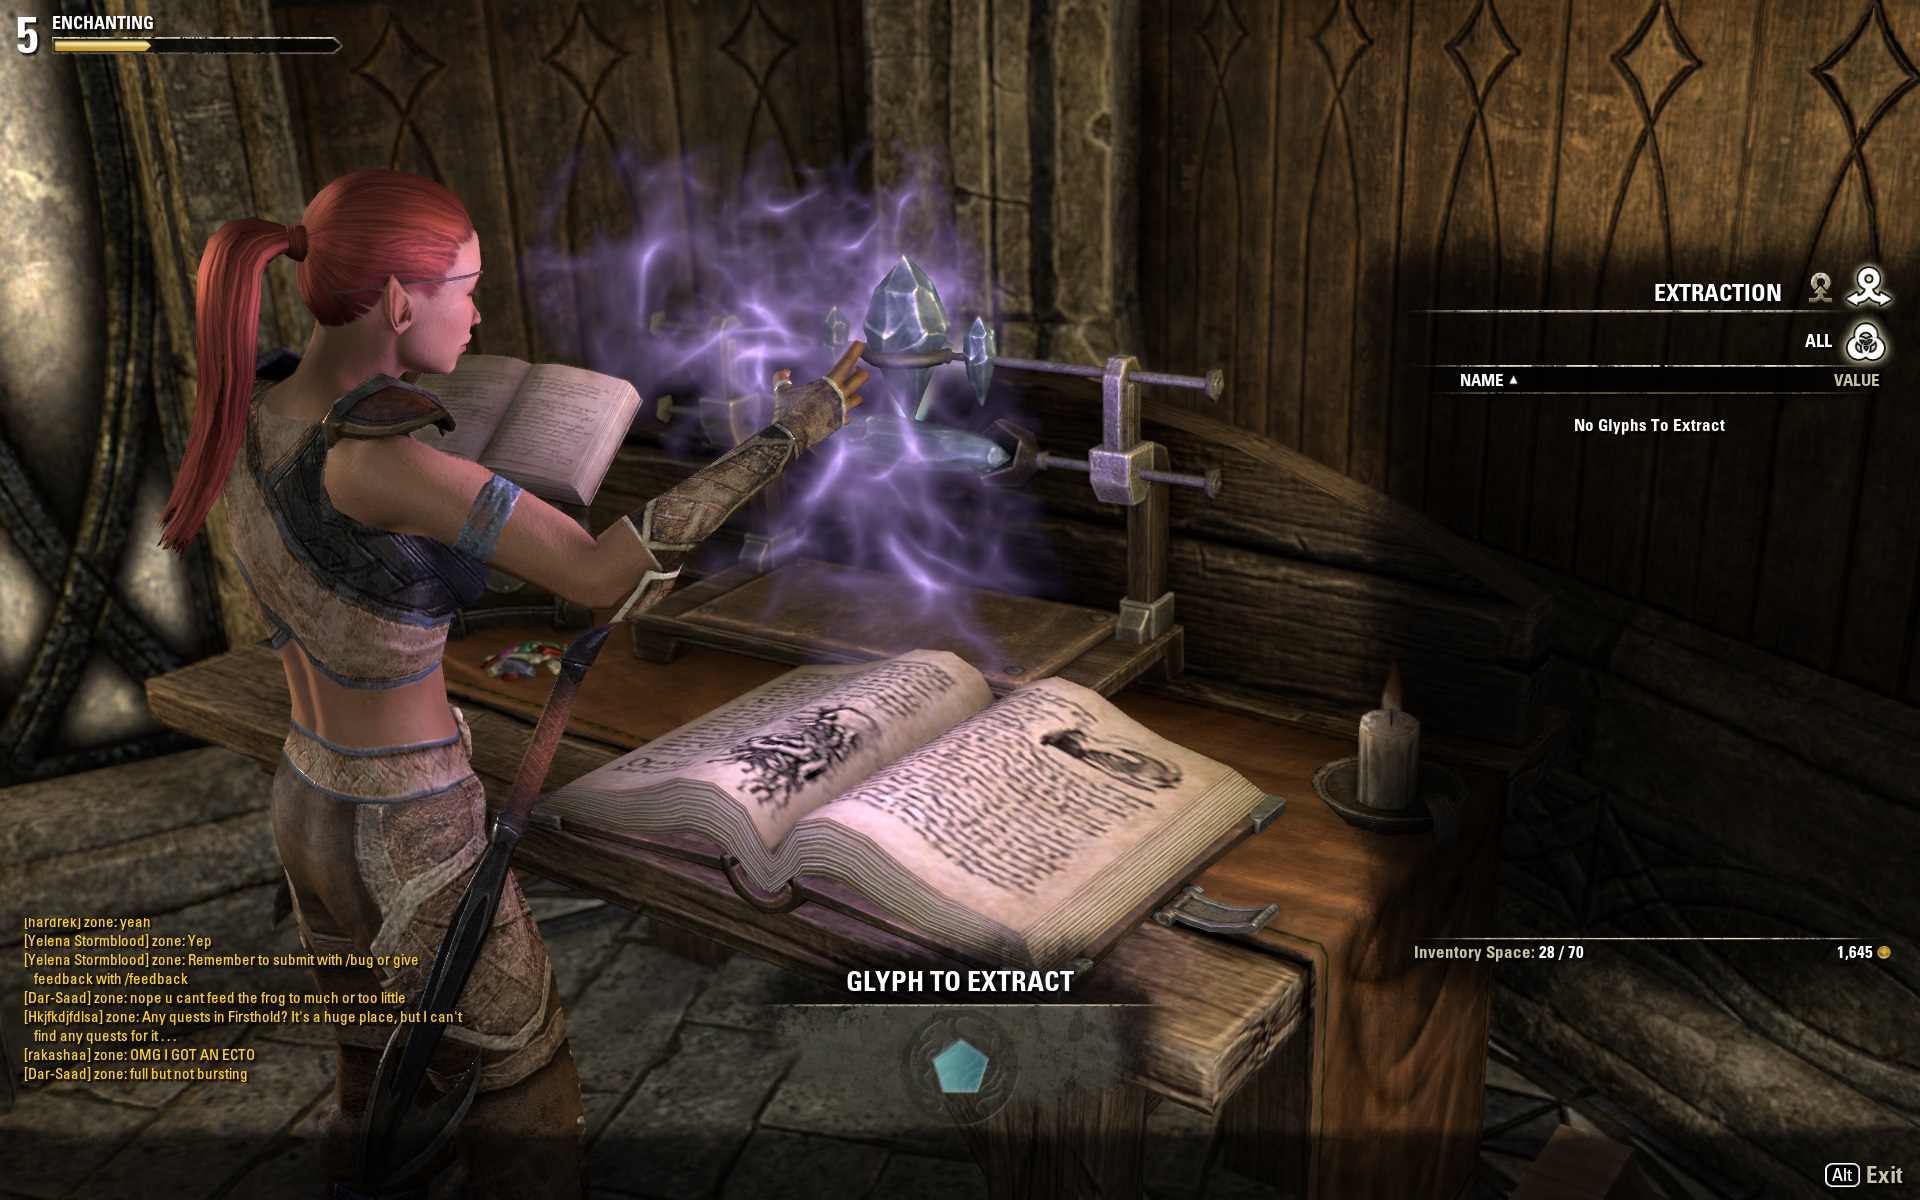
The image above shows the Extraction window. If I had a Glyph in my inventory or bank, it would appear in the main window, which I could then extract into a SINGLE rune. Again, the skills points you invest determine how rare and how strong those runes are.
Class Sets
One final thing to note. Throughout the world there are various "set" crafting stations which allow you to create "set" pieces, which give various bonuses, unique looks, and other additives to crafting. These crafting stations are hidden all over the world and let you craft these types of "styles" for basically all levels of character. For example, crafting items at Alessia's Bulwark crafting station gives a +100 armor bonus when wearing three pieces of the set! So keep your eyes open when exploring the world and dungeons and let your neighborhood/guild crafters know their locations!
Conclusion
As I've mentioned, adding skill points into your crafting is what I believe will be the determining factor of high level crafters. Not everybody will want to put those skill points into crafting, instead focusing on attack, armor, PVP, etc. skills instead...but I do foresee crafting being needed. But if you do not plan on crafting, at least put the materials into the Guild Bank (once we have it available) to assist those in crafting in the long run!